The customer support teams were drowning with the overwhelming volume of customer inquiries at every company I’ve worked at. Have you had similar experiences?
What if I told you that you could use AI to automatically identify, categorize, and even resolve the most common issues?
By fine-tuning a transformer model like BERT, you can build an automated system that tags tickets by issue type and routes them to the right team.
In this tutorial, I’ll show you how to fine-tune a transformer model for emotion classification in five steps:
- Set Up Your Environment: Prepare your dataset and install necessary libraries.
- Load and Preprocess Data: Parse text files and organize your data.
- Fine-Tune Distilbert: Train model to classify emotions using your dataset.
- Evaluate Performance: Use metrics like accuracy, F1-score, and confusion matrices to measure model performance.
- Interpret Predictions: Visualize and understand predictions using SHAP (SHapley Additive exPlanations).
By the end, you’ll have a fine-tuned model that classifies emotions from text inputs with high accuracy, and you’ll also learn how to interpret these predictions using SHAP.
This same approach can be applied to real-world use cases beyond emotion classification, such as customer support automation, sentiment analysis, content moderation, and more.
Let’s dive in!
Choosing the Right Transformer Model
When selecting a transformer model for Text Classification, here’s a quick breakdown of the most common models:
- BERT: Great for general NLP tasks, but computationally expensive for both training and inference.
- DistilBERT: 60% faster than BERT while retaining 97% of its capabilities, making it ideal for real-time applications.
- RoBERTa: A more robust version of BERT, but requires more resources.
- XLM-RoBERTa: A multilingual variant of RoBERTa trained on 100 languages. It is perfect for multilingual tasks, but is quite resource-intensive.
For this tutorial, I chose to fine-tune DistilBERT because it offers the best balance between performance and efficiency.
Step 1: Setup and Installing Dependencies
Ensure you have the required libraries installed:
!pip install datasets transformers torch scikit-learn shapStep 2: Load and Preprocess Data
I used the Emotions dataset for NLP by Praveen Govi, available on Kaggle and licensed for commercial use. It contains text labeled with emotions. The data comes in three .txt files: train, validation, and test.
Each line contains a sentence and its corresponding emotion label, separated by a semicolon:
text; emotion
"i didnt feel humiliated"; "sadness"
"i am feeling grouchy"; "anger"
"im updating my blog because i feel shitty"; "sadness"
Parsing the Dataset into a Pandas DataFrame
Let’s load the dataset:
def parse_emotion_file(file_path):
"""
    Parses a text file with each line in the format: {text; emotion}
    and returns a pandas DataFrame with 'text' and 'emotion' columns.

    Args:
    - file_path (str): Path to the .txt file to be parsed

    Returns:
    - df (pd.DataFrame): DataFrame containing 'text' and 'emotion' columns
    """
    texts = []
    emotions = []

    with open(file_path, 'r', encoding='utf-8') as file:
        for line in file:
            try:
                # Split each line by the semicolon separator
                text, emotion = line.strip().split(';')

                # append text and emotion to separate lists
                texts.append(text)
                emotions.append(emotion)
            except ValueError:
                continue

    return pd.DataFrame({'text': texts, 'emotion': emotions})

# Parse text files and store as Pandas DataFrames
train_df = parse_emotion_file("train.txt")
val_df = parse_emotion_file("val.txt")
test_df = parse_emotion_file("test.txt")
Understanding the Label Distribution
This dataset contains 16k training examples and 2k examples for the validation and testing. Here’s the label distribution breakdown:
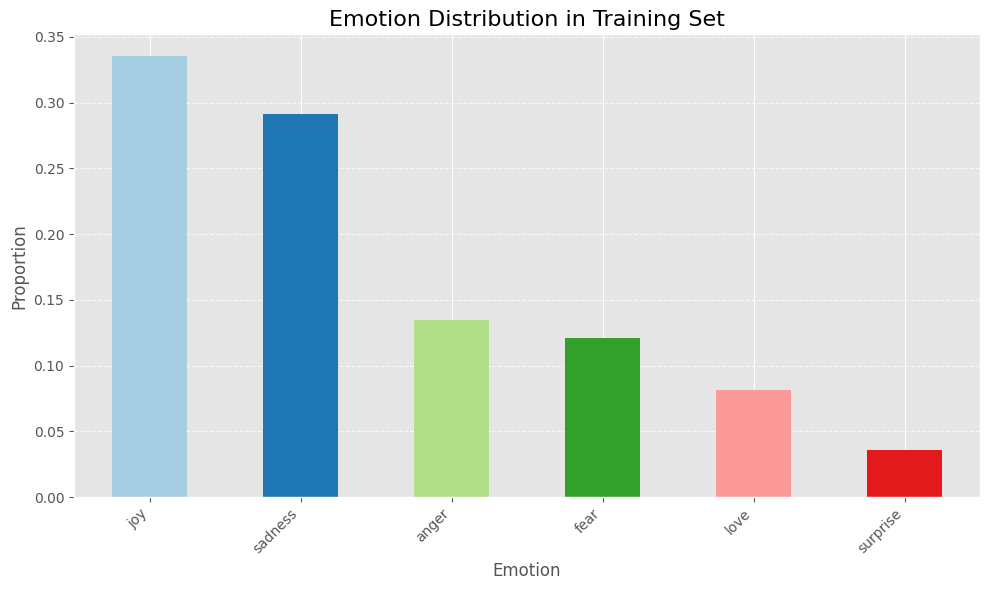
The bar chart above shows that the dataset is imbalanced, with the majority of samples labels as joy and sadness.
For a fine-tuning a production model, I would consider experimenting with different sampling techniques to overcome this class imbalance problem and improve the model’s performance.
Step 3: Tokenization and Data Preprocessing
Next, I loaded in DistilBERT’s tokenizer:
from transformers import AutoTokenizer

# Define the model path for DistilBERT
model_name = "distilbert-base-uncased"

# Load the tokenizer
tokenizer = AutoTokenizer.from_pretrained(model_name)
Then, I used it to tokenize text data and transform the labels into numerical IDs:
# Tokenize data
def preprocess_function(df, label2id):
    """
    Tokenizes text data and transforms labels into numerical IDs.

    Args:
        df (dict or pandas.Series): A dictionary-like object containing "text" and "emotion" fields.
        label2id (dict): A mapping from emotion labels to numerical IDs.

    Returns:
        dict: A dictionary containing:
              - "input_ids": Encoded token sequences
              - "attention_mask": Mask to indicate padding tokens
              - "label": Numerical labels for classification

    Example usage:
        train_dataset = train_dataset.map(lambda x: preprocess_function(x, tokenizer, label2id), batched=True)
    """
    tokenized_inputs = tokenizer(
        df["text"],
        padding="longest",
        truncation=True,
        max_length=512,
        return_tensors="pt"
    )

    tokenized_inputs["label"] = [label2id.get(emotion, -1) for emotion in df["emotion"]]
    return tokenized_inputs

# Convert the DataFrames to HuggingFace Dataset format
train_dataset = Dataset.from_pandas(train_df)

# Apply the 'preprocess_function' to tokenize text data and transform labels
train_dataset = train_dataset.map(lambda x: preprocess_function(x, label2id), batched=True)
Step 4: Fine-Tuning Model
Next, I loaded a pre-trained DistilBERT model with a classification head for our text classification text. I also specified what the labels for this dataset looks like:
# Get the unique emotion labels from the 'emotion' column in the training DataFrame
labels = train_df["emotion"].unique()

# Create label-to-id and id-to-label mappings
label2id = {label: idx for idx, label in enumerate(labels)}
id2label = {idx: label for idx, label in enumerate(labels)}

# Initialize model
model = AutoModelForSequenceClassification.from_pretrained(
    model_name,
    num_labels=len(labels),
    id2label=id2label,
    label2id=label2id
)
The pre-trained DistilBERT model for classification consists of five layers plus a classification head.
To prevent overfitting, I froze the first four layers, preserving the knowledge learned during pre-training. This allows the model to retain general language understanding while only fine-tuning the fifth layer and classification head to adapt to my dataset. Here’s how I did this:
# freeze base model parameters
for name, param in model.base_model.named_parameters():
    param.requires_grad = False

# keep classifier trainable
for name, param in model.base_model.named_parameters():
    if "transformer.layer.5" in name or "classifier" in name:
        param.requires_grad = True
Defining Metrics
Given the label imbalance, I thought accuracy may not be the most appropriate metric, so I chose to include other metrics suited for classification problems like precision, recall, F1-score, and AUC score.
I also used “weighted” averaging for F1-score, precision, and recall to address the class imbalance problem. This parameter ensures that all classes contribute proportionally to the metric and prevent any single class from dominating the results:
def compute_metrics(p):
    """
    Computes accuracy, F1 score, precision, and recall metrics for multiclass classification.

    Args:
    p (tuple): Tuple containing predictions and labels.

    Returns:
    dict: Dictionary with accuracy, F1 score, precision, and recall metrics, using weighted averaging
          to account for class imbalance in multiclass classification tasks.
    """
    logits, labels = p

    # Convert logits to probabilities using softmax (PyTorch)
    softmax = torch.nn.Softmax(dim=1)
    probs = softmax(torch.tensor(logits))

    # Convert logits to predicted class labels
    preds = probs.argmax(axis=1)

    return {
        "accuracy": accuracy_score(labels, preds),  # Accuracy metric
        "f1_score": f1_score(labels, preds, average='weighted'),  # F1 score with weighted average for imbalanced data
        "precision": precision_score(labels, preds, average='weighted'),  # Precision score with weighted average
        "recall": recall_score(labels, preds, average='weighted'),  # Recall score with weighted average
        "auc_score": roc_auc_score(labels, probs, average="macro", multi_class="ovr")
    }
Let’s set up the training process:
# Define hyperparameters
lr = 2e-5
batch_size = 16
num_epochs = 3
weight_decay = 0.01

# Set up training arguments for fine-tuning models
training_args = TrainingArguments(
    output_dir="./results",
    evaluation_strategy="steps",
    eval_steps=500,
    learning_rate=lr,
    per_device_train_batch_size=batch_size,
    per_device_eval_batch_size=batch_size,
    num_train_epochs=num_epochs,
    weight_decay=weight_decay,
    logging_dir="./logs",
    logging_steps=500,
    load_best_model_at_end=True,
    metric_for_best_model="eval_f1_score",
    greater_is_better=True,
)

# Initialize the Trainer with the model, arguments, and datasets
trainer = Trainer(
    model=model,
    args=training_args,
    train_dataset=train_dataset,
    eval_dataset=val_dataset,
    tokenizer=tokenizer,
    compute_metrics=compute_metrics,
)

# Train the model
print(f"Training {model_name}...")
trainer.train()
Step 5: Evaluating Model Performance
After training, I evaluated the model’s performance on the test set:
# Generate predictions on the test dataset with fine-tuned model
predictions_finetuned_model = trainer.predict(test_dataset)
preds_finetuned = predictions_finetuned_model.predictions.argmax(axis=1)

# Compute evaluation metrics (accuracy, precision, recall, and F1 score)
eval_results_finetuned_model = compute_metrics((predictions_finetuned_model.predictions, test_dataset["label"]))
This is how the fine-tuned DistilBERT model did on the test set compared to the pre-trained base model:
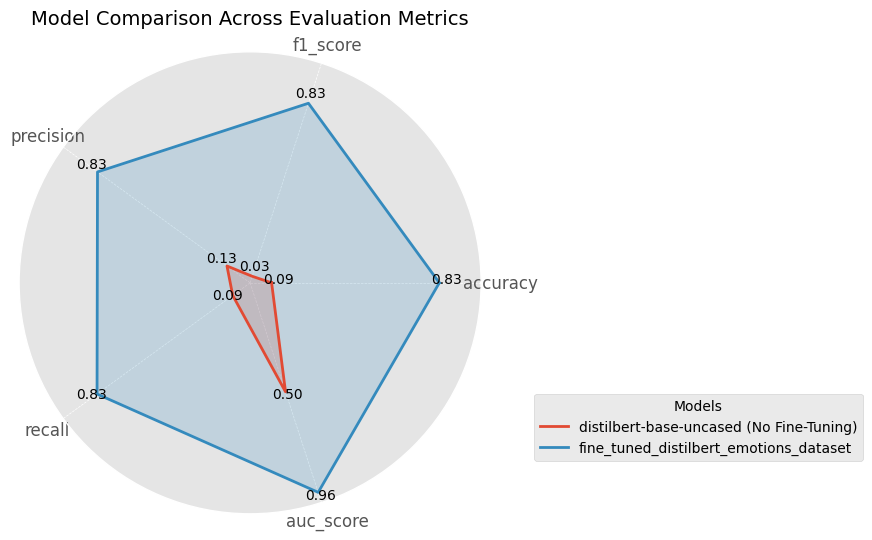
Before fine-tuning, the pre-trained model performed poorly on our dataset, because it hasn’t seen the specific emotion labels before. It was essentially guessing at random, as reflected in an AUC score of 0.5 that indicates no better than chance.
After fine-tuning, the model significantly improved across all metrics, achieving 83% accuracy in correctly identifying emotions. This demonstrates that the model has successfully learned meaningful patterns in the data, even with just 16k training samples.
That’s amazing!
Step 6: Interpreting Predictions with SHAP
I tested the fine-tuned model on three sentences and here are the emotions that it predicted:
- “The thought of speaking in front of a large crowd makes my heart race, and I start to feel overwhelmed with anxiety.” → fear 😱
- “I can’t believe how disrespectful they were! I worked so hard on this project, and they just dismissed it without even listening. It’s infuriating!” → anger 😡
- “I absolutely love this new phone! The camera quality is amazing, the battery lasts all day, and it’s so fast. I couldn’t be happier with my purchase, and I highly recommend it to anyone looking for a new phone.” → joy 😀
Impressive, right?!
I wanted to understand how the model made its predictions, I used using SHAP (Shapley Additive exPlanations) to visualize feature importance.
I started by creating an explainer:
# Build a pipeline object for predictions
preds = pipeline(
    "text-classification",
    model=model_finetuned,
    tokenizer=tokenizer,
    return_all_scores=True,
)

# Create an explainer
explainer = shap.Explainer(preds)
Then, I computed SHAP values using the explainer:
# Compute SHAP values using explainer
shap_values = explainer(example_texts)

# Make SHAP text plot
shap.plots.text(shap_values)
The plot below visualizes how each word in the input text contributes to the model’s output using SHAP values:

In this case, the plot shows that “anxiety” is the most important factor in predicting “fear” as the emotion.
The SHAP text plot is a nice, intuitive, and interactive way to understand predictions by breaking down how much each word influences the final prediction.
Summary
You’ve successfully learned to fine-tune DistilBERT for emotion classification from text data! (You can check out the model on Hugging Face here).
Transformer models can be fine-tuned for many real-world applications, including:
- Tagging customer service tickets (as discussed in the introduction),
- Flagging mental health risks in text-based conversations,
- Detecting sentiment in product reviews.
Fine-tuning is an effective and efficient way to adapt powerful pre-trained models to specific tasks with a relatively small dataset.
What will you fine-tune next?
Want to build your AI skills?
👉🏻 I run the AI Weekender and write weekly blog posts on data science, AI weekend projects, career advice for professionals in data.
Resources